Manage projects
Switch, rename, color, group, archive, and delete projects.
The projects list on the left of the window holds all your projects. This page shows how to keep it in order.
Switch projects
Select a project in the list. You can also:
- Press
Ctrl+1toCtrl+9(Cmd+1toCmd+9on macOS) to switch to one of your first nine projects. Hover over a project to see its key. - Open the command palette and type the project name.
Projects keep running in the background
When you switch to another project, the one you leave keeps running. Its terminals keep their commands going, its agents keep working, and its tabs stay as you left them. When you come back, everything is where it was.
Some switches take a moment. If so, Termul shows Switching project… and keeps the old project on screen until the new one is ready.
Each project in the list shows what happens inside it:
- A spinning circle means something is running.
- A gray dot means an agent chat is open and waiting.
- A colored badge with a number means chats need your answer. Select the badge to open the chat.
- Crashed means a terminal in the project crashed.
- Green and red numbers, such as +10, count the lines added and removed in changes you haven't committed yet.
Change a project
Right-click a project to open its menu.
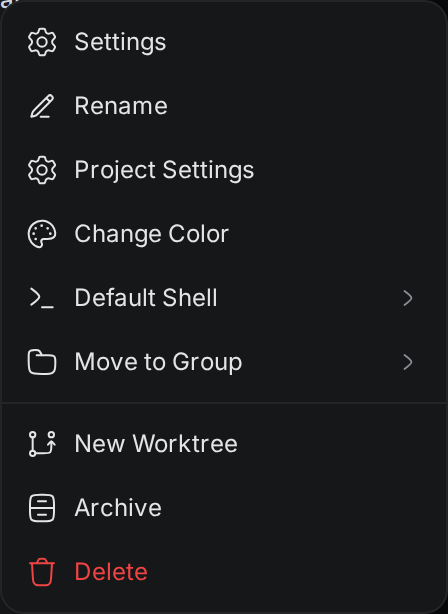
Rename a project
- Right-click the project and select Rename.
- Type the new name and press
Enter. PressEscto cancel.
Renaming changes only the name in Termul. The folder keeps its name.
Change the color
- Right-click the project and select Change Color.
- Select a color.
The color shows on the project's icon in the list and in the command palette.
Change the default shell
Right-click the project, point to Default Shell, and select a shell. New terminals in this project use it.
Open the project settings
Select the gear icon next to the project, or right-click it and select Settings. The Project Settings window opens, with these sections: General, Environment Variables, Shell Settings, Worktree Symlinks, Provider, and Emergency Mode. See Settings.
The Project Settings item in the same menu opens a smaller window. Use it to change the name, folder, color, and default shell in one place, then select Save Changes.
Reorder projects
Drag a project up or down in the list.
Group projects in folders
A folder group collects projects under one heading in the list. Groups exist only in Termul. They don't move any files.

To create a group:
- Select + next to Projects, then select New folder group.
- In Group Folder Name, type a name.
- Select Create.
To put a project in a group, use one of these:
- Drag the project onto the group.
- Right-click the project, point to Move to Group, and select the group. Select No Group (Root) to take it out again.
- Right-click the project, point to Move to Group, and select Create New Group... to make a group and move the project into it.
Select a group's name to collapse or expand it. Drag a group to change its place in the list.
Right-click a group, or select the … button next to it, for these actions:
- Rename Group and Change Color.
- Add Project lists your projects with check boxes. Select a project to add it to the group or take it out. Import Project... at the bottom picks a folder and adds it as a new project in this group.
- Delete Group (Keep Projects) removes the group and moves its projects back to the main list.
- Delete Group & All Projects removes the group and every project in it from Termul.
Groups and the order of the list are saved in this browser or on this computer. They don't follow you to other devices.
Archive a project
Archive a project to move it out of the way without removing it.
- Right-click the project and select Archive.
- If chats or terminals are still running in it, Termul asks first. Select Stop and archive to stop them and archive the project, or Keep project to cancel.
Archived projects move to the Archived section at the bottom of the list. Select the section to show or hide them. You can still select an archived project to open it.
To bring a project back, right-click it in Archived and select Restore.
Delete a project
Deleting a project removes it from Termul. Termul doesn't delete the folder or any files in it.
- Right-click the project and select Delete.
- Select Delete to confirm.
- If chats or terminals are still running in the project, Termul asks again. Select Stop and delete to stop them and delete the project, or Keep project to cancel.
To use the folder again later, add it as a project. See Add a folder you already have.